Getting My Digi On – Incorporating a Digital page in Your Project Life Album

Did you know that the digital Project Life kits aren’t just for digital scrapbookers? If you create “physical” albums, or work with “physical” cards and kits, you might never have considered using the digital kits out there. I mainly work with the physical cards and photo pocket pages, but there are times when using digital kits work in my favor.

My daughter recently celebrated her 14th birthday and I knew I wanted to include an insert showcasing a few more photos than I normally would. I also really wanted to use some different cards than I had already in my sets of cards. I had a few digital kits waiting to be used, so I went to work putting this page together:

This page came together in a few short minutes and I’m going to show you how it’s done. You will need Photoshop (or Elements) for this tutorial.

1. Open your digital template in Photoshop. I used a template from the “Squared Away” set. It was template #15. When you open the template, you will look to the right, on your layers palette, and click on the little “eye” icon beside the top layer to “hide” it. Now you will see the template clearly and all of the different layers, just like a physical photo pocket page! You will be able to drag and drop photos/digital PL cards into the different spots, just like a physical page. 

2. Open the photos and digital cards/papers you will want to use on your digital layout. Do this by clicking in the upper left hand corner, File>Open and browsing for your photos and/or digital PL goodies. For this page, I used cards from Amy Tangerine’s awesome Plus One Mini kit. LOVE this – especially for my teenage daughter’s page!
3. When your photos are selected and opened in Photoshop, they will probably appear, one by one, side by side on the screen – you will only be able to see one photo at a time. You will need to drag and drop your photo onto the template, which means you will need to see them side by side. Click on the top of your photo and (holding the mouse button down) drag it down until it appears in a “floating” window. 
4When your photo/digital card is open next to your template, drag it onto your template by clicking on the photo, holding down the mouse, dragging the mouse over the template, then letting go of the mouse button. You will have a copy of your photo now on the template, as well as the original photo open. Close the original.

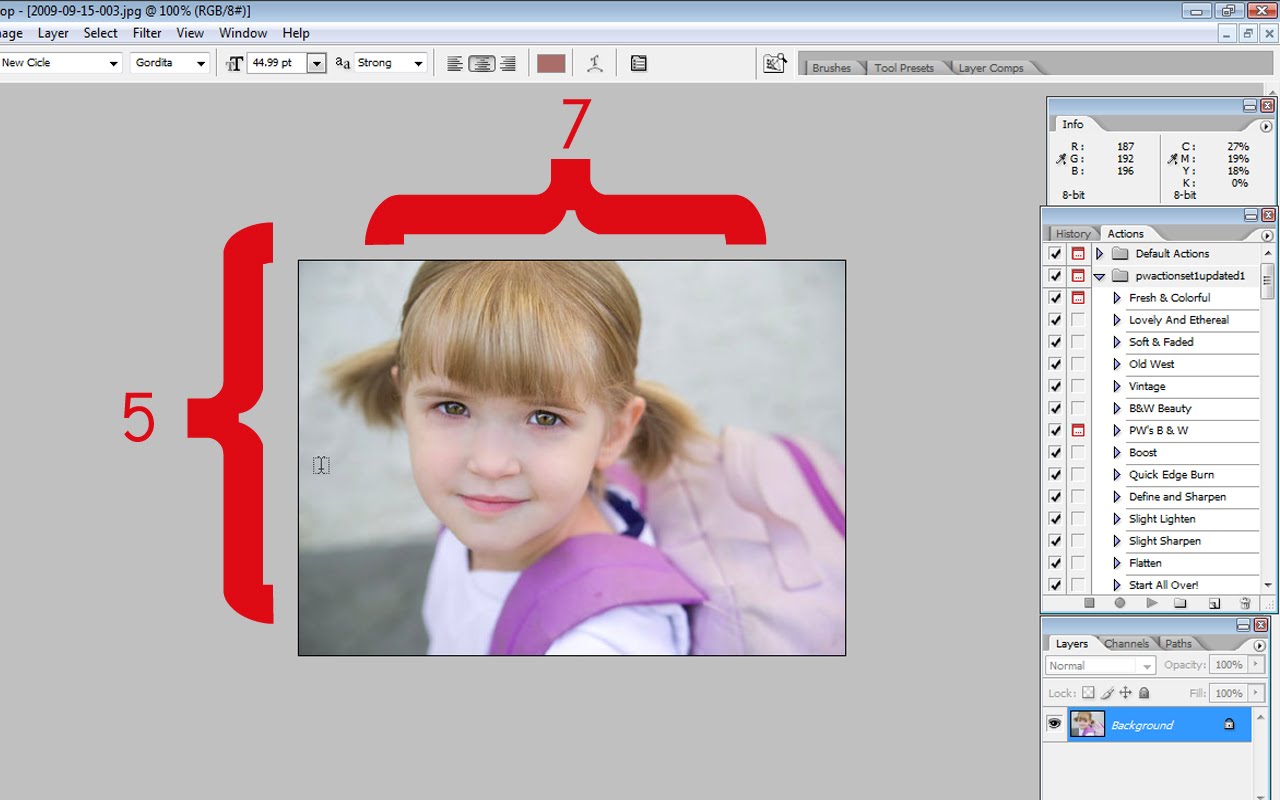
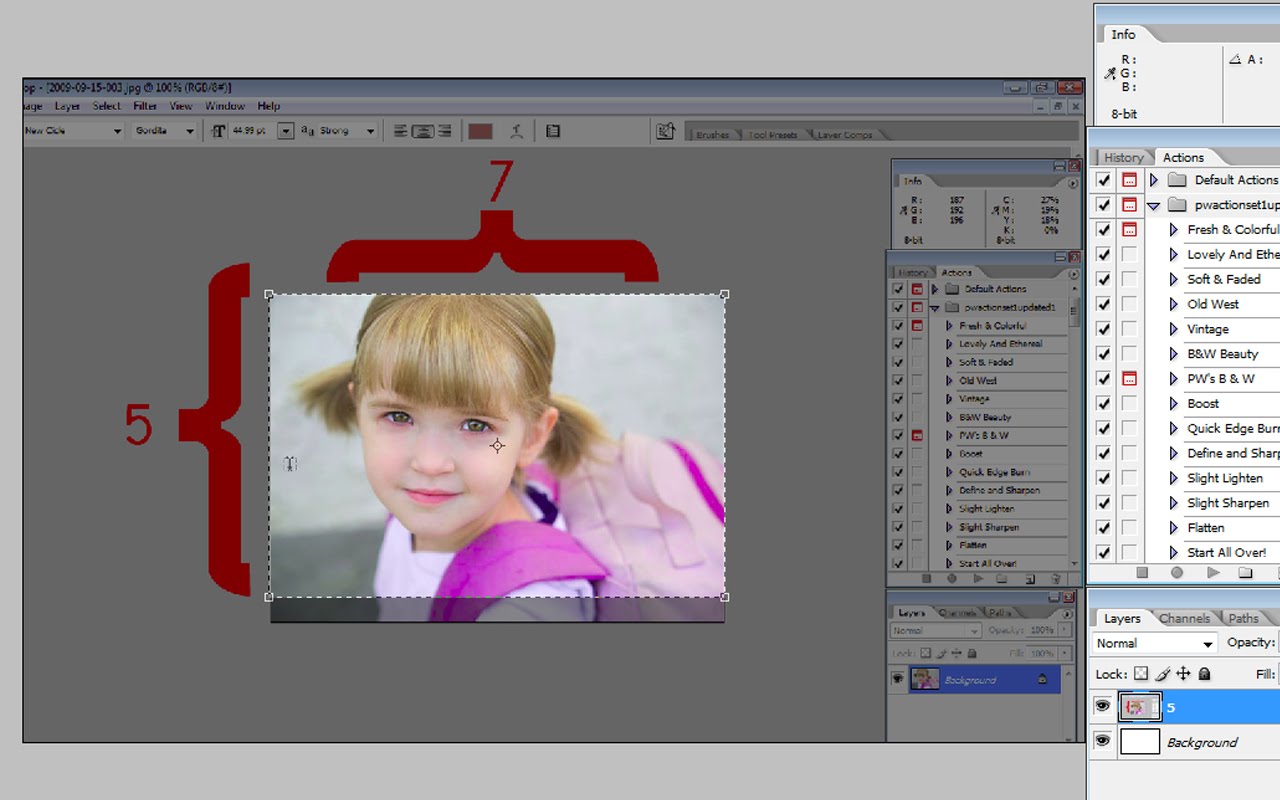
5. Now we are going to do the MAGIC part! It’s what will make the card/photo conform to the shape of the “pocket” shape on the template. This is so easy – you’ll love that you will know how to do this! Okay, so – in the photo above, you can see the layer that the arrow is pointing to? That is your card you just dragged and dropped. You will click on that layer and drag it down so it sits above the layer/shape you want it to conform to on the template. For my page, I wanted it to appear in the spot that is the third row down, third from the left, on the template. I found where that shape was on my layers palette and dragged my card layer to be just above it.

6. Okay, now the magic – click on (at the top of your screen) Layer>Create Clipping Mask. All of a sudden your photo will attach itself to the shape! It might be a lot bigger than the shape, or it might need to be moved over, but you can play with it. with your card layer still selected, use the move tool (the top arrow icon on your tools palette to the left of the screen) to move your card around so it is centered on the shape. You can also resize or change the orientation – whatever! Cool!

7. Now simply repeat those same steps with the other digital cards/photos until you have filled all of the spots on the template! You can flatten and save as (don’t save over the original template!) and order as a print – Costco is one photo lab that prints 12X12. I printed this page and added it right into my physical PL album.

I love how versatile these templates are, and how I can include a lot more photos about an event into my regular weekly spread this way. Once you have gotten the hang of working with clipping masks and digital templates, you will be amazed by how fast these pages come together. Go get yourself a digital kit, a digital template, and start playing! I think you’ll be hooked 🙂

Photobucket

Tutorial – Learning About Aspect Ratio

A while ago I had a “Ask Me Anything” post and one reader wrote in to ask:

12. Micki asks “That age old ‘printing certain sizes’ question. Some say you have to crop to a specific size but what if I like the crop the way it is??? I was also told I would have to save for each size…. that could mean 2 or 3 saves for particular photos….. i’m so confused…. personally I should be able to crop the photo to the 2:3 or whatever dimension and I should be able to get 4×6, 5×7, etc.. prints from that without it ‘cutting’ some of the picture.
 
That is a great question, and a common one. Today I want to share my answer as it’s own post, one that you can refer back to whenever you need a little reminder 🙂 
 
What you’re really wondering about is ASPECT RATIO. It’s essentially the relationship between the width and height of the photograph. When you are cropping your photo to the 3:2 ratio, for example, you are cropping a relationship, not an actual specific measurement. Does that make sense? 
Let’s say that I have an image with a 3:2 aspect ratio. The actual size of this image in pixels can be 300 x 200, or 600 x 400,  or 1350 x 900. So long as the relationship between the width and the height is always 3 to 2, the aspect ratio does not change even though the size of the image does. The resolution can be different.
 
So, a 3:2 ratio will give you a completely different crop than a 5:7 ratio, for example. Here is an example chart of different common print sizes, and their aspect ratios:
 
Print Size Aspect Ratio
4×6 3:2
5×7 7:5
8×10 5:4
20×30 3:2
So, if you upload a photo that has a 3:2 ratio, but you want to print a 5X7 or an 8X10 print, you are going to lose some of your photo as it will have to be cropped. Let me show you an example.
This is a photo of my daughter. It currently has a 5:7 aspect ratio. Different cameras automatically produce images with different aspect ratios. Let’s say my camera produces photos at a 5:7 aspect ratio, like this one.  I could order a print as a 5X7 and it would appear exactly like the photo below.
But let’s say I wanted to print it as a 4X6, not a 5X7. Well, let’s see what happend when I try to crop the image in photoshop, using a width of 6 in and a height of 4in. 
 
Can you see the part at the bottom of the photo that will be cut off? That’s because a 4X6 photo has an aspect ratio of 2:3, NOT 5:7. 
If I wanted to order the print as an 8X10, what would happen?
Now I’m losing some off the side, because an 8X10 photo has an aspect ratio of 5:4, not 5:7. If you want the photos you are seeing to come out in print exactly the way you see them, you can either use a camera that automatically uses the same aspect ratio as the prints you order (eg. use a camera that produces image with an aspect ration of 3:2, if you order 4X6 shots). OR, crop the photos in a photo editing program BEFORE you order your prints. That way you can control what get’s cropped off your photo. There is no “one size fits all” ratio that works for every print size, unfortunately.

Photobucket

Tutorial – Adding a Signature To Your Posts

Happy Monday, Friends!

I had a fab reader and friend, Talia, ask about how to add a signature to the bottom of your posts. The answer is, you need to add the signature image to your post template so that it appears on every post. I am going to walk you through the steps to adding YOUR signature to your posts. It’s very simple and it adds that nice personal touch to your posts.

1. First, you need to create your signature. This is how I did it. I opened Photoshop and clicked on “File>New” to create a new canvas to work on. I entered the following numbers into the fields. I always like to start out with a 300 ppi resolution, then resize to 72ppi afterward. So, just start out with these numbers and click “OK”.

2. Select the TYPE tool (T) from your tools palette, choose a font and a color and then create your signature by typing your name. I like choosing a fun, handwritten type font. IF you have your own handwritten signature scanned or on your computer as an image, just open that up as an image in photoshop and skip this step of creating one. 

3. Now that I have typed my name, I will flatten the image and click on “Image>Image Size” to resize the signature for the web. Just enter the numbers below. I changed the resolution to 72 ppi and adjusted the amounts to 160 pixels wide by 60 pixels high. You can change it to be any size you’d like, but I find that this is a nice size for a signature. Click OK and save it to your computer somewhere (I save mine to “My Pictures” usually)

4. Now that you have created and saved your “signature”, you will want to upload it to a photo hosting website like Photobucket. Just click the green “upload” button at the top of the screen and in seconds, your image will appear. If you hover your mouse over your signature image, you will see some different code options appear. You will want to copy the “HTML Code”. Usually clicking once on the code box will automatically copy this code.

5. You can now open the back end of your blog and click on “Settings>Posts and Comments”. There should be a box (empty) next to where it says “Post Template”. You will want to paste that code that you copied from Photobucket into this box by clicking once in the box, then clicking “Ctrl+V”. Your code should appear in the box like below, except it won’t have the “

” code.

6. I added the code in the red brackets to center my signature on my posts. You can omit this code if you don’t want your signature centered.


Okay, so now…when you open your Blog to start writing a new post, you should automatically see your signature there! Simply write your post above the signature as always, leaving the signature to appear at the end of your post.

I hope it’s what you were looking for! I’d love to have you link to your blogs so I can see YOUR signatures!

Photobucket